Showing posts with label house. Show all posts

Monday, December 7, 2015

DIY White Woodland Christmas

DIY White Modern Christmas Decorating

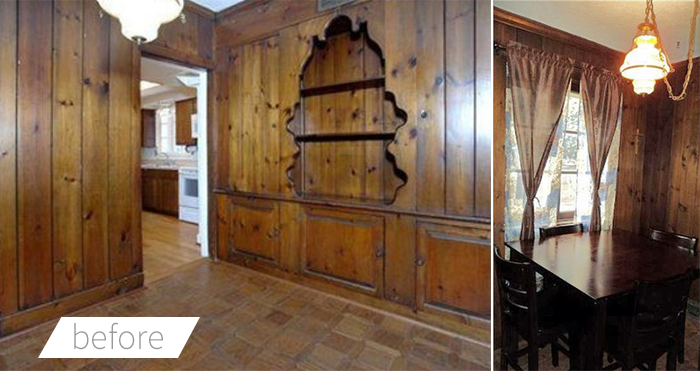
Last Christmas, our living room walls were dark paneled wood. I tried my best to decorate for the holiday and lighten up the mood in the room, but I just couldn't get over how dark and cavernous the dark wood panels made everything feel. It was right after the holiday that we decided to paint the paneling white. And this year, I couldn't wait to decorate our space. Everything came together quite nicely and I went with a white woodland theme. Some of my favorite details include our tiny gingerbread woodland animals on the mantel, cinnamon scented pinecones in the tablescape, and the amazing DIY customizable wall plate from adorne by Legrand on our wall.

DIY White Modern Christmas Decorating
DIY White Modern Christmas Tablescape

To create our tablescape, I used live garland from Trader Joes (cut down to about 5-6 feet), cinnamon scented pinecones from our local grocery store, clementines for color, and a mixture of candlesticks and ivory candles.

 DIY White Modern Christmas Tablescape

DIY White Modern Christmas Mantel

To create the mantel display, I used more of the live garland as a swag and made a gingerbread woodland forest with IKEA DRÖMMAR and Vinter cookie cutters. 

DIY White Modern Christmas Mantel
DIY IKEA Gingerbread Cookies
DIY Custom Holiday Wall Plate adorne by Legrand

This is the custom wall plate from adorne by Legrand that I decorated using metallic cardstock, boxwood twine, a tiny plastic deer head, and thin red ribbon. It's the perfect addition to our decorations and provides a lot of visual interest to an otherwise empty wall. The coolest thing about it was how easy it was to decorate. Almost all the DIYs I tackle end up taking more time than I anticipate, but designing this wall plate took about a half hour start to finish. Decorating the plate (not the electrical set-up, clearly) would be a great project to do with kids. 

DIY Custom Holiday Wall Plate adorne by Legrand

Click through to see the full DIY and more details! 
DIY Custom Holiday Wall Plate adorne by LegrandDIY Custom Holiday Wall Plate adorne by LegrandDIY Custom Holiday Wall Plate adorne by Legrand

What You'll Need: 

1. Custom Wall Plate, 1-Gang+, Magnesium Trim - adorne by Legrand 
2. 6x6 Metallic Cardstock - Copper Colored - Joann Fabrics
3. Trophy Antlers - Tim Holtz Idea-ology
4. Boxwood Twine - Tim Holtz Idea-ology
5. 1/8" Red Ribbons
6. Glue, Scissors, X-Acto Knife

Instructions:

1. Watch this installation video on using the Custom Wall Plate. It's insanely easy to use with any wallpapers and the copper metallic paper I used was a breeze to install. To cut it to size, I used scissors and an X-Acto knife.
2. Attach the Trophy Antler to the metallic cardstock using a little glue.
3. Cut a 5" strip of Boxwood Twine and twist the ends together.
4. Hang the Boxwood wreath over the deer head.
5. Tie a bow around the bottom of the wreath.
6. That's it! You're done. Hang and enjoy your custom holiday light switch!

* adorne by Legrand provided the light switch and Custom Wall Plate that appears in this post. 

Sunday, January 4, 2015

DIY Modern Vanity

DIY Modern and Minimal Makeup Vanity Table

I had this antique mahogany vanity in our bedroom for quite some time. And even though it was gorgeous, it was too large for our space and wasn't comfortable as an everyday makeup table. So we found it a new loving home and went to work creating a more minimal modern vanity more suited for our space.

I wanted something sleek and able to organize my makeup. One, among many, surprises of pregnancy has been my insatiable desire for order and organization. Maybe it's part of the whole nesting thing, but I suddenly want, no NEED, systems in place for everything. Closets, cabinets, drawers, you name it, I want to organize it.

I saw the EKBY ALEX shelf awhile back and thought it may look cool paired with tapered wood legs. Rich spray painted shelf brackets white and stained tapered legs with a cherry oil stain. And ta-da! A pretty rad looking set up for minimal cost and efforts. Here's how we did it...

DIY Modern and Minimal Makeup Vanity Table

The weekend we tackled this project, we made a Target run and stumbled upon the new Threshold mirror pictured below. I think I audibly gasped when I saw it and said to Rich that it was exactly what I had in mind for this space. We were a little concerned the actual size of the mirror was too small, but it seems to work just fine. 

DIY Modern and Minimal Makeup Vanity Table

I've had this Threshold woven bench for a few months. I bought it not knowing exactly where I would put it in our house, so it jumped from room to room until I realized it would make a great vanity bench.

DIY Modern and Minimal Makeup Vanity Table

Look at that organization! I snagged two bamboo drawer organizers from Homegoods to hold loose items like makeup brushes and eyeshadows and they fit in with the aesthetic perfectly.

DIY Modern and Minimal Makeup Vanity Table

To warm the bench up a bit, I threw my sheepskin throw and a perfectly matching pillow on top of it. It makes this a super comfy place to sit in the morning and get ready. 

DIY Modern and Minimal Makeup Vanity Table
DIY Modern Makeup Vanity with IKEA EKBY Alex Shelf


DIY Modern and Minimal Makeup Vanity Table


What You'll Need: 

1. Wooden round mirror- Threshold for Target
2. Jewelry stand - Anthropologie
3. Faux fur pillow - Threshold for Target
4. EKBY Alex Shelf with drawers - IKEA
5. Sheepskin throw - IKEA
6. Wooden bench/stool - Threshold for Target
7. Wood Table Leg - 27.5" Tapered - Lowe's
8. 6"x8" Shelf Brackets - Home Depot
9. Cherry oil wood stain - Lowe's 
10. Table Leg straight top plate - Lowe's

How We Did It:

1. Spray paint the shelf brackets white with a paint + primer.
2. Stain the tapered legs with a cherry wood stain.
3. Assemble the Alex shelf.
4. Using wall anchors (we used anchors with a 50lb. weight allowance) secure the shelf brackets to the wall.
5. Secure the Alex shelf to the brackets.
6. Attach the straight top plates to the Alex shelf.
7. Screw the tapered legs to the plates. 

Thursday, August 7, 2014

DIY Breakfast Nook Reveal - Before + After

DIY Breakfast Nook Corner Bench Seat Desert Modern Geometric Art

When we first moved into our house, dark wood paneling was EVERYWHERE. It completely overwhelmed our small rooms and created a cavernous vibe. We knew the breakfast nook, a room right off our kitchen, was a space we would spend a lot of time and both craved light-filled minimalism.

We spent a few weeks debating the concept of painting real wood paneling. Were we ruining perfectly good wood? Should we just live with it? Can we take down the wood and use it somewhere else in the house? We came to the conclusion that the most important thing was us loving our space. And we love white walls. So we painted them white. And afterwards, we realized how much we love not only white walls, but white paneled walls. The texture is so cool and adds a dynamic visual. We loved them so much that we recreated a faux paneled look in our upstairs hallway.

DIY Breakfast Nook White Desert Modern Wood Paneling
DIY Breakfast Nook White Desert Modern Wood Paneling Leather Brass Handle Pulls

Here are the before shots of the breakfast nook. If you can believe it, these photos are actually much more light-filled and exposed than the room was in reality. If I were to put up a true representation, it would look like I shot this space at night.


DIY Breakfast Nook White Desert Modern Wood Paneling Leather Brass Handle PullsCheck out the full breakfast nook reveal after the jump!
DIY Breakfast Nook White Desert Modern Wood Paneling Leather Brass Handle PullsDIY Breakfast Nook with White Desert Modern Wood Paneling RusticDIY Breakfast Nook White Desert Modern Wood Paneling - Geometric ArtDIY Breakfast Nook White Desert Modern Wood Paneling - Marble IslandDIY Breakfast Nook White Desert Modern Wood Paneling Leather Brass Handle PullsDIY Breakfast Nook with White Desert Modern Decor + Wood PanelingDIY Breakfast Nook with White Desert Modern Decor + Mid Century LampDIY Breakfast Nook with White Desert Modern Decor + Geometric Art

SOURCES:
Shellac-Based Primer - Zinsser B-I-N
Wall Paint - Benjamin Moore's Harwood Putty
Rattan Pendant Light - IKEA BÖJA
Jute Area Rug- HomeGoods
Table Legs - IKEA LERBERG (spray painted with matte white)
Bench - 2x4's, Thin Plywood, Cabinet Coat paint
Bench Cushion - MDF, Foam and Canvas Drop Cloth
Throw Pillows- Etsy, Anthropologie, Target, Homegoods and eBay
DIY Leather + Brass Pull Handles - A Brick House's tutorial
Table Lamp + Faux Skull- HomeGoods
Mirror- Pottery Barn
Art Print- Made by me
Frame- IKEA RIBBA

The hardest part of this DIY project was painting the paneling. We started by deglossing, lightly sanding, and then washing down the walls with soap and water. We let it dry for 24 hours and then began priming with very thin coats of shellac-based primer. As a warning, this stuff smells terrible, so you'll definitely want to make sure you have proper ventilation (we wore masks, too) before you begin. We did three coats primer, spot treating knotty areas where needed. After that, we painted two coats of Benjamin Moore's flat interior paint in the color Harwood Putty. It's the perfect color for textured paneling and one of my favorite white paints. Have a question about our breakfast nook? Leave a comment below! 

Monday, July 14, 2014

THE KITCHEN

Modern White Eclectic Kitchen DIY Renovation ntropologie bracket Butcher block countertop

Modern White Eclectic Kitchen DIY Renovation Kilim Rug Butcher block countertop

The day is finally here! I am so excited to share our kitchen. It has been a LONG time coming and this project felt, at times, as if we tackled more than we could handle. All of the work of this remodel was done by Rich, myself and gracious friends and family willing to lend expertise and muscle. Despite its challenges, we finished. And all of the blood, sweat and tears (yes, literally) were worth it because we ADORE this space.

Here's the before shot of our kitchen. The photo quality isn't great, but they are the most forgiving and appealing photos I could track down. I don't need to explain the cons of our previous kitchen, but our main issues were the fluorescent lighting, dark wood cabinetry, beat up/burnt laminate countertops, butter yellow brick accent wall, and fake brick as backsplash. I also had a hard time with all the upper cabinetry. Since it's a galley kitchen layout, I didn't have anywhere to do all of my food prep, so some of the upper cabinets had to go to give it a more open feel with additional work space.

Modern White Eclectic Kitchen DIY Renovation Before and After

Modern White Eclectic Kitchen DIY Renovation Before and After Kilim Rug Butcher block countertop

And in case you missed that...
  Modern White Eclectic Kitchen DIY Renovation Before and After
DIY Modern Kitchen renovation before and after subway tile
See our full kitchen reveal after the jump!

DIY Modern White Eclectic Kitchen DIY Renovation Before and After

DIY Modern White Eclectic Kitchen DIY Renovation Before and After

DIY Modern White Eclectic Kitchen DIY Renovation Before and After kilim rug

DIY Modern White Eclectic Kitchen DIY Renovation Before and After wood

Modern White Eclectic Kitchen DIY Renovation Before and After IKEA butcher block countertop

Refinishing the cabinetry was, by far, the most labor intensive part of this remodel. We wanted to keep the original cabinets because they are a great brand, Wood-Mode, and the wood itself was in good condition. Plus, I dig the cabinet style as it mimicks the white paneled look we have throughout the rest of the house. So we broke out the white paint. 

The process included cleaning, deglossing, and sanding (using multiple grits) until they were smooth. Then we primed using Zinsser Shellac primer. We have painted a TON of wood in our house, and believe me when I say this is the only primer that worked for us (water based just didn't get the job done). We painted them using 2-3 coats of CabinetCoat in White Dove. This product is amazing and worth every penny. This self-leveling paint has a protective enamel coating, so even with Scout regularly nose-diving for food scraps, our cabinets don't have a single chip and look like a professional job. 

DIY Modern White Eclectic Kitchen DIY Renovation Before and After basket dog

The countertops are IKEA's Numerar butcher block in beech. We needed three 73 inch pieces, and had some leftover that we made into cutting boards. We were worried about care and maintenance of unsealed butcher block, but it has held up beautifully with regular use of mineral oil.

Modern White Eclectic Kitchen DIY Renovation Before and After Anthropologie Bracket

Modern White Eclectic Kitchen DIY Renovation Before and After IKEA butcher block countertop


Modern White Eclectic Kitchen DIY Renovation Before and After IKEA Numerar Butcher block countertop

Our kilim runner rug is one of my favorite parts of the kitchen. I have kilim rugs all over the house and just can't get enough of them. It brings much-needed color into the space and their low pile quality holds up to high foot traffic. I snagged it almost a year ago, and even though it's a one of a kind pattern, you can still find plenty like it online. 

Modern White Eclectic Kitchen DIY Renovation Before and After Kilim runner

Our entire remodel was extremely budget conscious, but when it came to picking brackets for the open shelving, Rich and I both felt like we couldn't skimp on hardware. We spent a good week researching open shelving designs and chose the brass wishbone brackets from Anthropologie. They matched the gold/brass cabinet pulls and have a sleek look from all angles. For the horizontal shelf, we bought a 1x8 board that we cut in half and primed/painted them using the exact same materials as the cabinets. 

Modern White Eclectic Kitchen DIY Renovation Before and After Anthropologie Bracket Hardware

White subway tile is paired with a brown-gold grout. Rich and I tested at least four different grout colors with the white tile before choosing this. It may just be that we are perfectionist color freaks, but picking a grout color other than black or white was tough. We landed on the color Haystack by Polyblend. I've heard some complaints about this grout bubbling, but it worked like a charm for us.

Listen up, my advice is to test a small section of tile before committing to the whole area. Use a hair dryer to quick-dry the spot to be sure you love the color. The amount of light you have in your kitchen and the color of tile you choose will make each grout color look very different. 

Modern White Eclectic Kitchen DIY Renovation Before and After Gold Spray paint hardware

Modern White Eclectic Kitchen DIY Renovation Before and After Shelf arrangement

Modern White Eclectic Kitchen DIY Renovation Before and After natural wood
SOURCES: Cabinet Pulls: IKEA. Cabinet Pull Spray Paint: KRYLON, Countertops: IKEA, Cabinet Paint: CABINETCOAT in White Dove, Subway Tile: LOWES, Grout: POLYBLEND in Haystack, Open Shelf Brackets: ANTHROPOLOGIE Cabinet: Marble Pastry Slab: CRATE & BARREL, Lighting: IKEA, Kilim Runner Rug: OVERSTOCK, Wall Color: BENJAMIN MOORE SIMPLY WHITE

Are you thinking about doing a kitchen remodel? Have you done one recently? Ask any questions or tell me about your own experience in the comments!

{next house reveal: the breakfast nook!}

*We recently updated our kitchen's outlets and switches and the "before and after" is pretty dramatic.