Showing posts with label holiday. Show all posts

Monday, December 7, 2015

DIY White Woodland Christmas

DIY White Modern Christmas Decorating

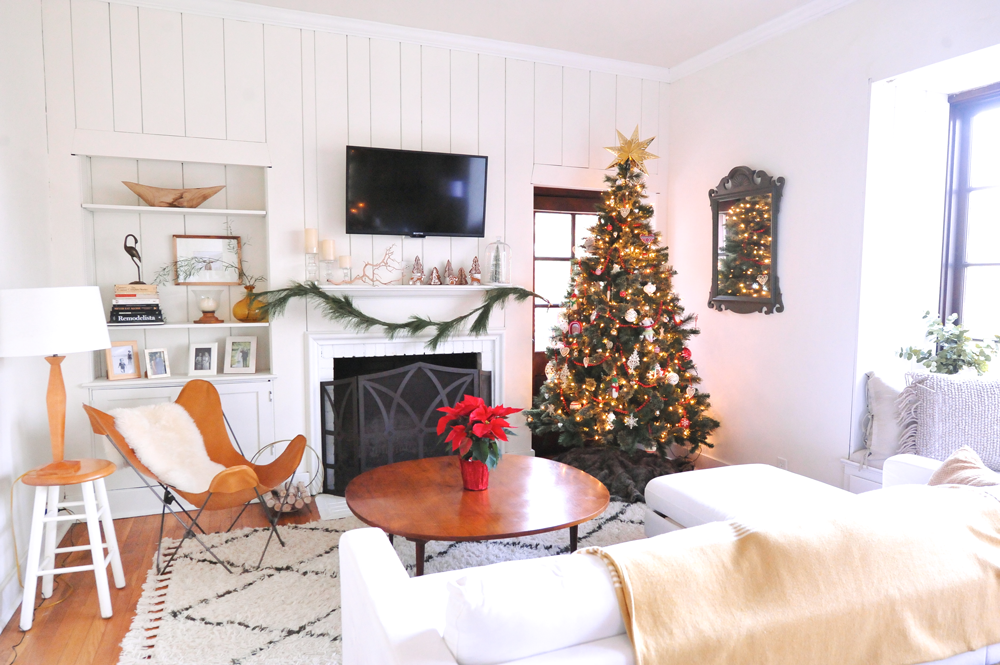
Last Christmas, our living room walls were dark paneled wood. I tried my best to decorate for the holiday and lighten up the mood in the room, but I just couldn't get over how dark and cavernous the dark wood panels made everything feel. It was right after the holiday that we decided to paint the paneling white. And this year, I couldn't wait to decorate our space. Everything came together quite nicely and I went with a white woodland theme. Some of my favorite details include our tiny gingerbread woodland animals on the mantel, cinnamon scented pinecones in the tablescape, and the amazing DIY customizable wall plate from adorne by Legrand on our wall.
DIY White Modern Christmas Decorating
DIY White Modern Christmas Tablescape

To create our tablescape, I used live garland from Trader Joes (cut down to about 5-6 feet), cinnamon scented pinecones from our local grocery store, clementines for color, and a mixture of candlesticks and ivory candles.

 DIY White Modern Christmas Tablescape

DIY White Modern Christmas Mantel

To create the mantel display, I used more of the live garland as a swag and made a gingerbread woodland forest with IKEA DRÖMMAR and Vinter cookie cutters. 

DIY White Modern Christmas Mantel
DIY IKEA Gingerbread Cookies
DIY Custom Holiday Wall Plate adorne by Legrand

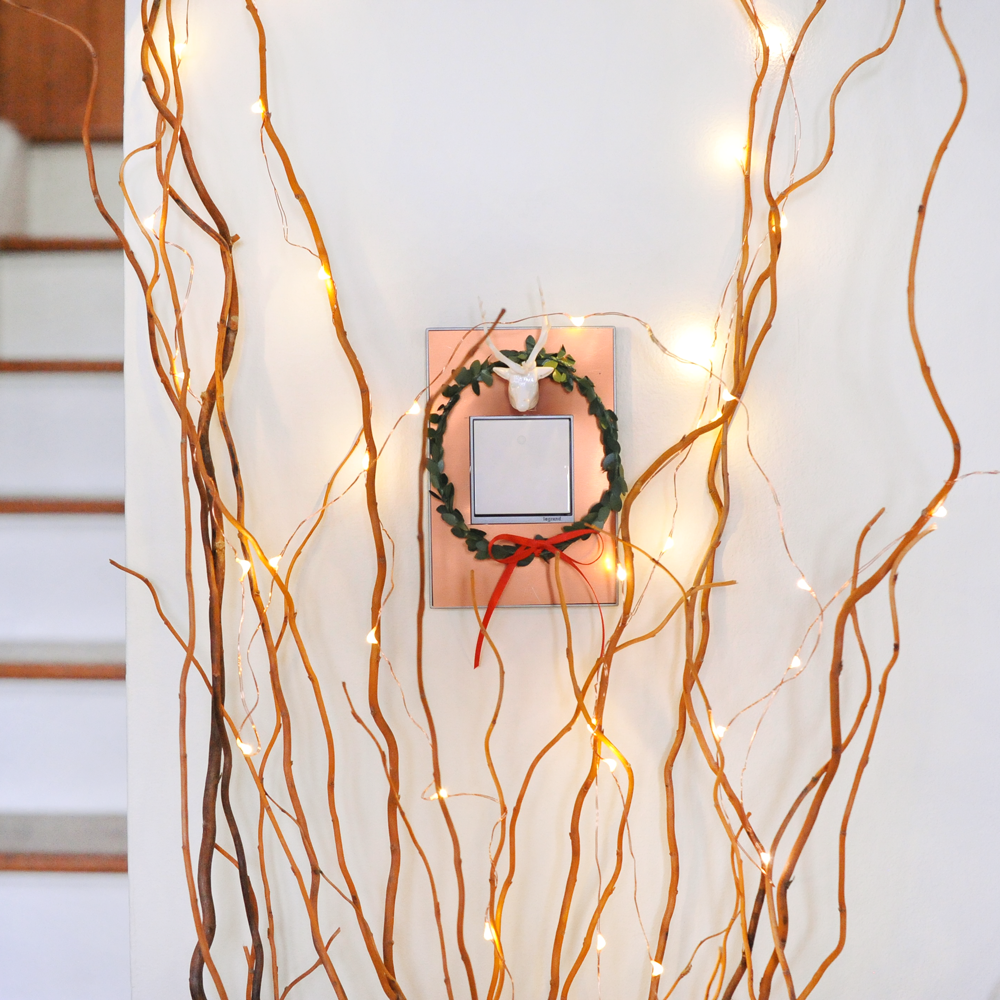
This is the custom wall plate from adorne by Legrand that I decorated using metallic cardstock, boxwood twine, a tiny plastic deer head, and thin red ribbon. It's the perfect addition to our decorations and provides a lot of visual interest to an otherwise empty wall. The coolest thing about it was how easy it was to decorate. Almost all the DIYs I tackle end up taking more time than I anticipate, but designing this wall plate took about a half hour start to finish. Decorating the plate (not the electrical set-up, clearly) would be a great project to do with kids. 

DIY Custom Holiday Wall Plate adorne by Legrand

Click through to see the full DIY and more details! 
DIY Custom Holiday Wall Plate adorne by LegrandDIY Custom Holiday Wall Plate adorne by LegrandDIY Custom Holiday Wall Plate adorne by Legrand

What You'll Need: 

1. Custom Wall Plate, 1-Gang+, Magnesium Trim - adorne by Legrand 
2. 6x6 Metallic Cardstock - Copper Colored - Joann Fabrics
3. Trophy Antlers - Tim Holtz Idea-ology
4. Boxwood Twine - Tim Holtz Idea-ology
5. 1/8" Red Ribbons
6. Glue, Scissors, X-Acto Knife

Instructions:

1. Watch this installation video on using the Custom Wall Plate. It's insanely easy to use with any wallpapers and the copper metallic paper I used was a breeze to install. To cut it to size, I used scissors and an X-Acto knife.
2. Attach the Trophy Antler to the metallic cardstock using a little glue.
3. Cut a 5" strip of Boxwood Twine and twist the ends together.
4. Hang the Boxwood wreath over the deer head.
5. Tie a bow around the bottom of the wreath.
6. That's it! You're done. Hang and enjoy your custom holiday light switch!

* adorne by Legrand provided the light switch and Custom Wall Plate that appears in this post. 

Friday, November 20, 2015

DIY Felt Stockings with Tassels & Poms

DIY Christmas Stocking with Tassels and Pom-poms
When I was a child, decorating for Christmas was a sport. My Grandma (on my dad's side) and my mom would go ALL OUT and transformed both of their homes into seriously magical worlds. My Grandma chose a theme each year and would buy all new decorations to match. One year was a gilded gold with a white tree and my 12-year-old self thought I had walked into Buckingham Palace. My mom's place is always on point, as well. She has serious decorating chops all year round, but Christmas is when she really shines. I always try to sucker her into helping me decorate my place around the holidays. And now that we have Emerson, I'm so looking forward to the magic of holiday decor.

One of my favorite decorating moments was when the Christmas stockings went up on the mantle. They would hang there in eager anticipation waiting to be filled and all throughout December I would check mine to see if anything had arrived early.

So this year, I wanted to make personalized stockings for Emerson, Rich and I. Inspired by the ever-lovely Anthropologie stockings, I decided to go with a yarn tassel and pom-pom look on wool felt. Not only are the results pretty darn cute, but it was much more affordable than anything store-bought.


DIY Christmas Stocking with Tassels and Pom-poms

Click through to see the full DIY after the jump!

DIY Christmas Stocking with Tassels and Pom-poms
DIY Christmas Stocking with Tassels and Pom-poms Embroidered Name
DIY Holiday Christmas Stocking Tassel & Pom-poms Anthropologie
DIY Holiday Christmas Stocking Tassel & Pom-poms

DIY Tassel + Pom-Pom Christmas Stockings

Materials


  • 2.5 Yards of Wool Felt
  • Silver embroidery thread 
  • Gold embroidery thread
  • Yarn for tassels and pom-poms 
  • Scissors 
  • Size 20 Chenille Needle
  • Sewing pins

Instructions

To begin, fold your wool felt in half. Trace a stocking shape on the felt by freehand or using a stocking you already have at home. Cut the shape out, both pieces of felt, so you have the front and back piece.  Use several sewing pins to keep the two felt pieces together (see image below). Using your silver embroidery thread, sew a blanket stitch around the perimeter of the stocking, leaving the top open.

Next, cut a 6" piece of felt for the top flap. Using the tracing paper method, write the name you'd like to embroider on the tracing paper, and secure it to the felt with sewing needs. I used a rope stitch for my letters and it was super easy and quick.

After you finish your name, fold one side up and do a blanket stitch to keep close the bottom. Secure it to the stocking with a blanket stitch on either side.

Now on to the yarn embellishments. You can definitely go crazy with this part, and feel free to make as many poms or tassels as you want. I bet you can come up with so many cool designs. I found myself trying to hold back on the poms and tassels because it was getting a little crazy. Make three yarn pom-poms in the colors of your choosing. Make two yarn tassels in the colors of your choosing. Secure the poms to the stocking using a needle and thread. Tie the tassels together and attach them to the top looped hook.

DIY Holiday Christmas Stocking Tassel & Pom-poms Instructions

Sunday, November 23, 2014

DIY Holiday Sparkle Glass Dome

Holiday Christmas Glass Dome Terrarium Tree

Last year, our holiday involved a kitchen renovation and traveling in and out of town, so I opted out of decorating for the holidays. I assured myself it didn't matter and kept saying how I had saved myself the work of cleaning up come January. But not having my own sparkly pine-scented green and red retreat was such a bummer. So this year I went all out. And I started early so we can enjoy the frivolity as long as possible. And I know many people have a strict "don't decorate until after Thanksgiving" rule, but I think you should just do what feels right.

So here is a super simple holiday DIY that you can do in less than an hour that will yield adorable sparkly winter wonderland results.

Holiday Christmas Glass Dome Terrarium TreeHoliday Christmas Glass Dome Terrarium Tree Holiday Christmas Glass Dome Terrarium Tree
DIY Holiday Christmas Glass Dome Terrarium Tree

What You'll Need: 

12" Glass Bell Jar Dome
*Mine is Martha Stewart Collection's dome found here.
Anthropologie Aurora String Lights, 15ft. 
*We got our tree from West Elm. They don't have it listed online, but you may be able to find it in-store this season. I suggest calling ahead and asking.  
Double-sided tape (something like this will do)

Cut a piece of double-sided tape and firmly stick it on the base of your glass dome. Place the miniature pine tree on the taped base until it's nice and sturdy. Take the tall glass dome and flip it upside down. Gently place the string lights in the top. While still holding the glass dome upside down, place the base (with the attached tree) on the top. Flip the entire piece right side up again. Carefully and gently use your hand to drape the lights strategically around the tree until you're happy with the distribution. And voila! Plug it in and let the holiday wonder take over. 

Monday, February 13, 2012

happy valentine's day

I hope you are extra sweet to the people you love and appreciate today...regardless of whether they are a partner, spouse, child, friend, coworker, sibling, neighbor, or even pet. Have a lovely day, everyone!

happy vday image

Wednesday, December 28, 2011

Looming Large

It was 11AM when our trusty Lincoln Towncar pulled in to the Family Heirloom Textile Factory in Red Lion, PA. The factory is housed right besides the old farm and creek where Granny (Rich's grandmother), used to hunt muskrats with her cousins who were well-versed in the art of trapping.

As with many of life's great things, it was not much of a sight from the outside. But as we stepped inside, owner David Kline, sitting at an antique desk with his fingers clasped, started to talk and offered to give us a tour through his looming factory. And the rest was, is, and will continue to be amazing history.


Family Heirloom Textiles 3

The Family Heirloom Textile factory is one of the only surviving textile mills in the United States. Taking original 18th and 19th century loom designs, the factory produces new rugs, stair runners, throws, curtains, etc.

Family Heirloom Factory 6

The entire production process is incredibly intricate. As you can see below, hundreds of cardboard pages with holes designating designs are woven together into a long instruction sheet for the looms. It takes hundreds of sheets to create just a few shapes or letters.

Family Heirloom Textile 1

Authenticity-seeking Hollywood producers commission David to make stair runners and carpets for their historical fiction blockbusters (Gettysburg, Gods & Generals, etc.) and he has a tear-sheet that would make any prop-dealer green with envy.

Family Heirloom Factory 4

Most of the machines are antiquated and worth virtually nothing outside the walls of the factory. But they are the heart and soul of Family Heirloom. David and a few employees keep them up and running on their knowledge and elbow grease alone.

Family Heirloom Factory 5

Family Heirloom Textiles 2

DSC_7227

DSC_7253

DSC_7223

DSC_7193

Here is a glimpse at some of the fabrics they produce. Rich and I bought a few pounds of scrap fabric to cover our wooden stairway.

DSC_7245

Next door to the factory is a charming old stone home completely outfitted with many of Family Heirloom's designs. You can browse, shop and take a little 18th century home with you.

DSC_7268

DSC_7260

Monday, December 19, 2011

A late December birthday

Celebrating a birthday near Christmas always gets a bad rap...but having a late-December birthday myself, I can attest to its greatness.

DSC_7003

The chilling weather makes hibernating indoors socially acceptable, holiday baked goods abound, and friends and family are in festive and celebratory moods.

DSC_7059

Today, I think I'm going to curl up in bed and enjoy a sugar cookie or two.

DSC_7007

When I splurged and bought my Anthropologie duvet last year, this is precisely the scene I imagined.

DSC_6965

Rich mixed a perfect palette of icing colors (check out the unique lavender and goldish mustard) as I decorated the cookies.

DSC_7089

I think this year's cookies turned out quite lovely. And as most of these types of projects go, they felt too pretty to eat...but we got over that feeling quickly.

DSC_7065

I used this popular sugar cookie recipe (word to the wise: let the dough chill overnight, it makes a world of difference when you go to cut out shapes) as well as this simple icing recipe. When it comes to sugar cookies and icing, I like to keep it traditional and defer to the tried and true recipes. However, let your creativity run wild when it comes to icing colors, decorations designs, and sprinkleology.

Monday, November 14, 2011

Starting to Deck the Halls

Each year around the holidays, my mom transforms our home in Pittsburgh into a warm, rustic, ribbon-and-raffia-flowing wonderland. It feels warm and all-encompassing in the most welcoming and festive way.

DSC_4890

This year I'll be in my Philadelphia home for a majority of the holidays, so I'm embarking on creating some my own holiday decorations to spark the spirit. The first of the season are Orange-Clove Pomanders.

DSC_4894

Grab between six and eight oranges and a bag full of whole cloves. Take their general color, shape and sturdiness into consideration (i.e. the cloves are actually whole and the oranges are round and unbruised).

DSC_4864

Plan out your designs and begin sticking the cloves directly into the oranges. Try to avoid putting too much pressure directly on the top of the cloves. You can use a toothpick to create holes beforehand if you prefer.

As you go along, pause every once in a while and smell the aromas the skin on your fingers takes on. It's better than any hand lotion you'll ever find in a store.


DSC_4912

After all of the cloves are inserted, roll in a mixture of spices (I used cinnamon, cloves, ginger and ginger). Then set aside for a few weeks until completely dry. Once dry, you can use as an ornament on a Pine, Wreath or Garland.

Thursday, November 10, 2011

Dark Chocolate Bark with Dried Cherries, Apples and Pistachios

DSC_4579


Lured by November warmth, deepening hues of foliage, and new sights to see, we have been exploring parks around our neighborhood.

fall frisbee 2

We're beyond belief spoiled.

Scout jumping

DSC_4844

Our favorite park so far has to be Pastorius in Chestnut Hill. If live in Philly and own a dog, or just live in Philly, you need to check out this gorgeous space before snow hits the ground.

Pastorius Park

In preparation for the holiday season, I've been trying to brainstorm reasonable gifts for neighbors. Holiday dark chocolate bark seems the perfect choice...impressive-looking, decadent and seasonal.

DSC_4607

Grab a few bars of your favorite dark chocolate (I hit my local Trader Joes and picked up the Dark Chocolate One Pounder). Melt the chocolate down using a double boiler and spread evenly across a baking sheet lined with parchment paper. Let cool for several minutes and proceed to sprinkle with any toppings you see fit. I went with dried apples, dried cranberries and pistachios (all from Trader Joes as well). Let cool completely and store in the refrigerator for up to two weeks.

DSC_4564

Once completely cooled, go ahead and break the chocolate apart. Be careful, the chocolate melts quickly when touched, so don't spend too much time worrying about the perfect breaks or if you're a perfectionist, use a wooden utensil.

DSC_4579

Once it's all broken up, throw back in the refrigerator to firm up again.

DSC_4610

And finally, dress it up and package for friends. I'll be perusing thrift stores over the next few weeks for antique tins to line with parchment or brown tissue paper and wrap a red ribbon and some bakers twine around for a near-effortless holiday treat.

DSC_4601